Showing posts with label project 52. Show all posts

Sunday, May 29, 2011

Wk 21 of 52

The Twirly


This week I worked on some new skirts,


this one here is a 2 layer twirly circle with serged raw edges,


done up in Strawberry Shortcake for dd.


I practiced on a few different ones


some with 1 or 2 layers, some with varying hem lengths, and a few different sizes.


Whatcha think about seeing these in the shop?


Saturday, May 21, 2011

Wk 20 of 52


Here I have a Baby Blanket


While trying to gather it all in my head I kept seeing different textures so the new little girl receiving it could enjoy feeling around everywhere.


The body of the front is flannel, the stems/leaves and flowers are fleece, the center circle is textured cotton and the trim is cotton velour, stitched on to a pre quilted backing.


Here's a few pics along the way, its not a full tut but if you have any questions feel free to ask away.


(after 5 attemps at drawing out what I was actually seeing in my head........)

heres a pictorial of the steps


I used # 8


then right at the end I saw I had this velour that matched perfectly so I just had to ad on the trim


Saturday, May 14, 2011

Wk 19 of 52

As I've been unpacking I realized dd had some old pieces of clothes that I could play with.

Here I took an old tee and the skirt part of an old dress, pieced them together with a scrap of fabric I had on hand to make this new play dress, yes play dress, it was just see if I could do it, I'm not a good 'knits' person so this was a bit challenging for me. I do think though with time & practice I could get the hang of it.


Saturday, April 16, 2011

Wk 15 of 52

Any intrest in this set being available in the shops once the move is done?

Photobucket


Here we have the Bucket Bag and Basic Wallet


Photobucket


Super huge and roomy, the bottom has stabalizer, the front pocket has lots of room and the inside pocket is great for keys

Photobucket


Photobucket


Photobucket


This set pictured is for sale at a tester/seconds price, $20 ppd.

Its not 100% perfect since its a first/tester.

Outside is a lightweight cotton canvas, inside is cotton woven


a KeykaLouPattern

Sunday, April 10, 2011

Wk 14 of 52

Since I'm taking a small break for packing and moving

I'm posting a new item that was made a few weeks ago but not featured as a "project 52"

Tea Party Dress


Photobucket


Photobucket


Photobucket


The apron, waist srap and trim on sleeves are made from a tea towel,


this is part of my upcycle vintage love catagory.


I really am very happy with the way it turned out and I cant wait to make more with my stack of tea towels I have pressed and waiting


available here

Sunday, April 3, 2011

Wk 13 of 52

Rabbits in Spring

Perfect for picking flowers or searching for eggs

from one cut of fabric I was able to get 3 sizes


Photobucket


Photobucket


Photobucket


All 3 are available here and here

Sunday, March 27, 2011

Wk 12 of 52


I love old hankies, teatowels & embroidered pillowcases.


I admit to having a good sized pile cleaned a pressed sitting in my fabric stash.


In my search of "what to do with ...."


I stumbled upon this handkerchief to bonnet tutorial.


I tried it out and captured along the way how I did it.


This tutorial will show how to upcycle/relove an old handkerchief


this could be a handmedown from grandpa or a thrift shop find


either way this lovely something old


will be something new and can continue its journey as such for generations


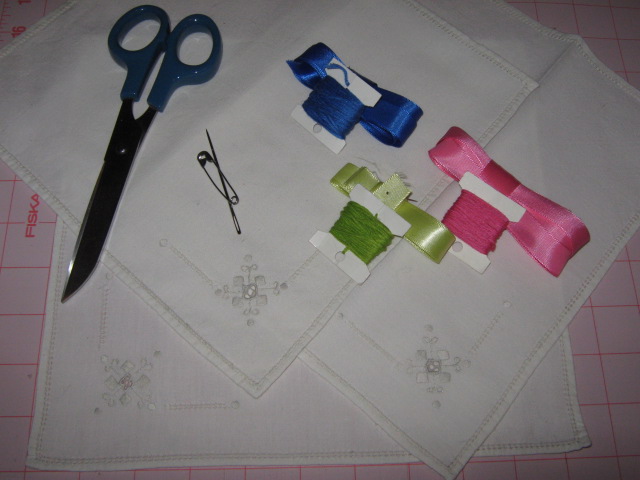
Supplies


Washed and pressed handkerchief, ribbon, thread, large needle, safety pin, scissors


Here I used colored ribbon & thread, feel free to use whatever colors you choose


Fold & iron two sides, the back side about an inch, the front side about 2-3 inches


Loosely stitch the small fold down, this will be the back side


Pull lightly and knot off, trim lose thread


Here's a quick 'how it should look' pic


Loosely thread the top fold down, here I used the holes already in the detail, if the handkerchief has lace you could thread through that as well


Lightly knot of both ends


Pin one end of ribbon and thread through the front fold


Trim ribbon ends, you can use a touch of fray check or slightly heat with a lighter to avoid unraveling


All Done! :)


Sunday, March 20, 2011

Wk 11 of 52

This week I did a few things,
to include the set of Rabbits in Spring dresses up for sale on the Riotcart shop.
But a turn was in for this weeks project 52.
I have Japanese Fat Quarters stocked up along with some Japanese fabric that mom brought back from her last trip.
I felt a big need to do something with them, also to add a touch of Japanese back into the shop since the Kyokos are on hold until the Fall.
So here we have it, a Buttercup Bag pattern by Made by Rae in Katsori print.
This one will be listed along with a few others in a day or two.
I'd love to hear your thoughts


Saturday, March 12, 2011

Wk 10 of 52

This week was a no sew project and a tut to boot
Baby Bunny Gift


~To make (a simple) Bunny
1 burp cloth,
2 baby wash cloths
a bit of ribbon


1. roll long sides of burp cloth in
(I pinned one side as I rolled the other)

here's both rolled,
pin to hold while you do the next step

2. fold up one corner of the wash cloth,
roll both up,
one will be the ears and one will be the arms


3. place the ears in the center of the body

4.fold the body over
place a bit of ribbon behind the burp cloth under the washcloth

tie the ribbon to form the head,
tuck the bow into the burp cloth


5.pull the washcloth/ears up and pin to hold,
tie a bit of ribbon at the base of the ears,
unpin

6.open the burp cloth/body and place in the second washcloth,
place ribbon behind again and tie under the arms to form the chest

again tuck bow into the burp cloth


7. bring arms together and pin to hold,
tie a bit of ribbon to hold arms,
unpin


You're done!


~To make a complete bunny gift~
Place bunny on top of a 4oz bottle

or before adding the ribbon to make the chest,
insert a 8-10 oz bottle,
tie chest ribbon around bottle too


before tieing arms add on a binky then tie
A complete yet simple gift in one